Growing your own spicy chili peppers can be a rewarding and delicious hobby. Whether you’re looking to spice up your meals or simply want to enjoy the satisfaction of home gardening, cultivating chili peppers on your balcony is entirely feasible and can yield impressive results. This guide will take you step by step through the process, from selection to harvesting, ensuring maximum flavor and yield.
1. Understanding Chili Peppers
Chili peppers belong to the Capsicum genus, which includes many varieties ranging from sweet bell peppers to super-hot varieties like Carolina Reapers. The heat of chili peppers is measured in Scoville Heat Units (SHU), with the scale ranging from 0 (bell peppers) to over 3,000,000 (the Carolina Reaper). Understanding the different types is essential for selecting the right pepper for your culinary preferences.
Latest Posts
- OnePlus 15T Smartphone Unveiled – Featuring 200MP Camera, Snapdragon 8 Elite Gen 5 and Massive Battery
- Lava Yuva 5G Unveiled – 120Hz Display and Strong Performance for Everyday Use
- Nokia 1100 Launched – Premium Keypad Phone Returns at Budget Price ₹2,500
- Motorola G96 5G Unveiled – Featuring Stylish Design, Strong Performance and Advanced Camera Tech
- Vivo Y21d Unveiled – Massive 6000mAh Battery for All-Day Everyday Use
- Nothing Phone 4 Ultra 5G Launched – 16GB RAM, AI-Powered 50MP Camera and Flagship Performance
- OnePlus 5G Smartphone Launched – 300MP AI Camera, 7000mAh Battery & 100W Fast Charging
- Nothing Phone 3a Pro – High processor smartphone for gaming lovers – battery is 5000mAH
- Realme 15 Pro – 3 days battery backup smartphone with 50MP front camera under ₹28,000
- Vivo X200 FE – 12GB RAM + 256GB Storage smartphone with HD quality camera
Popular Varieties to Grow:
- Jalapeño: Mild to moderate heat (2,500–8,000 SHU), versatile in cooking.
- Serrano: Hotter than jalapeños (2,500–5,000 SHU), great for salsas.
- Habanero: Very hot (100,000–350,000 SHU), fruity flavor excellent for hot sauces.
- Thai Chili: Fiery hot (50,000–100,000 SHU), widely used in Asian cuisine.
- Ghost Pepper: Extremely hot (1,000,000 SHU), used sparingly for flavor and heat.
2. Choosing the Right Containers
Container gardening is ideal for balconies. The type and size of containers are critical to the success of your chili pepper plants.
Container Selection:
- Material: Terracotta or plastic pots work best. Terracotta provides excellent drainage but needs more watering, while plastic retains moisture.
- Size: Choose pots at least 12 inches deep and 12-18 inches in diameter for optimal root growth.
- Drainage: Ensure pots have drainage holes to prevent waterlogging, which can lead to root rot.
3. Soil Requirements
The right soil mix is vital for supporting healthy growth.
Soil Composition:
- Well-Draining Soil: Use a potting mix designed for containers, ideally with added perlite or vermiculite to improve drainage.
- pH Level: Chili peppers thrive in slightly acidic to neutral soil (pH 6.0 to 7.0).
- Nutrients: Opt for a mix with slow-release fertilizer or amend your soil with compost to provide essential nutrients over time.
4. Sunlight and Location
Chili peppers need plenty of sunlight to thrive.
Ideal Conditions:
- Sunlight: Aim for at least 6-8 hours of direct sunlight daily. South-facing balconies are ideal.
- Protection: Consider wind protection, which can be crucial for pepper plants.
5. Planting Your Chili Peppers
Starting Seeds Indoors:
For a head start on the growing season, begin by germinating seeds indoors.
- Timing: Start seeds 6-8 weeks before the last frost date.
- Method: Plant two seeds per cell in seed trays with seed-starting mix. Cover lightly with soil and maintain a warm temperature (70-80°F or 21-27°C).
- Watering: Keep the soil moist but not soggy. A spray bottle works well for this.
Transplanting Seedlings:
When seedlings reach about 4-6 inches tall and have several true leaves, it’s time to transplant.
- Acclimatization: Slowly acclimate seedlings to outdoor conditions over a week (a process known as hardening off).
- Transplanting: Space seedlings about 12-18 inches apart in your selected containers.
6. Watering Techniques
Proper watering ensures healthy plant growth.
Watering Best Practices:
- Frequency: Water when the top inch of soil feels dry. Overwatering can lead to root rot, while underwatering may stress the plant.
- Technique: Water deeply to encourage deep root systems, but avoid allowing pots to sit in water.
7. Fertilization
Chili plants are hungry feeders, requiring regular fertilization.
Fertilizing Recommendations:
- Initial Feeding: Use a balanced fertilizer (like 10-10-10) during planting.
- Continuous Feeding: Switch to a high-potassium fertilizer (like 5-10-10) when fruits begin to develop. Fertilize every 4-6 weeks.
8. Pest and Disease Management
Monitoring for pests and diseases is crucial to maintaining plant health.
Common Pests:
- Aphids: Small, soft-bodied insects that suck plant juices. Use insecticidal soap or neem oil.
- Spider Mites: Tiny pests, causing yellowing leaves. Increase humidity and use miticides if necessary.
- Whiteflies: Another sap-sucking insect. Control with yellow sticky traps or insecticidal soap.
Common Diseases:
- Powdery Mildew: Caused by high humidity. Ensure good airflow around plants.
- Blight: Avoid wetting the foliage; remove diseased leaves immediately.
9. Pollination
Most chili pepper varieties are self-pollinating, but helping the process can enhance yields.
Pollination Tips:
- Shaking Plants: Lightly shake pots or use a soft brush to encourage pollen transfer.
- Attract Bees: Plant companion flowers to attract pollinators.
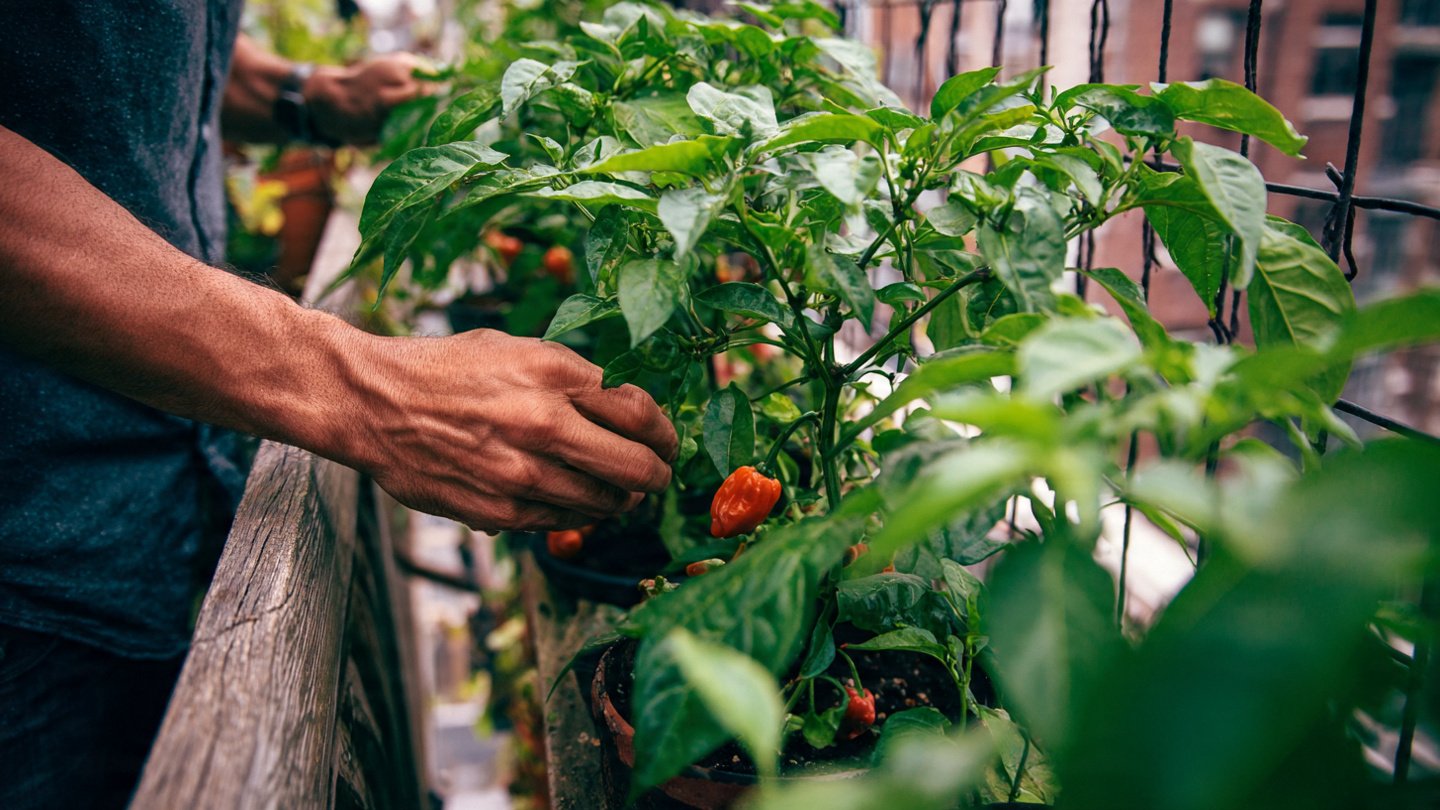
10. Harvesting Your Chili Peppers
Timing your harvest is crucial for flavor.
When to Harvest:
- Color Changes: For many varieties, peppers change color when ripe (e.g., green to red).
- First Frost: Harvest all peppers before the first frost to prevent damage.
How to Harvest:
- Cutting Peppers: Use scissors or pruning shears to avoid damaging the plant. Leave a small stem attached.
11. Preserving Your Harvest
After harvesting, you may want to preserve your chili peppers for later use.
Preservation Methods:
- Drying: Air-dry or use a dehydrator. Dried peppers can be ground into powder or used whole.
- Freezing: Wash and chop peppers, then freeze in airtight containers.
- Pickling: Slice peppers and soak them in vinegar for a zesty condiment.
12. Companion Planting
Companion planting can enhance growth and deter pests.
Beneficial Companions:
- Basil: Enhances flavor and deters pests.
- Marigolds: Repel nematodes and other harmful insects.
- Garlic: Acts as a natural pesticide.
FAQ Section
1. How long does it take for chili peppers to grow?
Typically, from seed to harvest, chili peppers can take anywhere from 60 to 150 days, depending on the variety and growing conditions.
2. What is the best time to plant chili peppers?
In most regions, the best time to plant chili peppers is after the last frost date in spring when soil temperatures have warmed to about 70°F (21°C).
3. Can I grow chili peppers indoors?
Yes, if adequate sunlight (or grow lights) and temperature conditions are provided, chili peppers can thrive indoors.
4. How can I tell how hot a chili pepper will be?
The heat level tends to correlate with the variety; refer to the Scoville Heat Units (SHU) scale for specifics. Generally, the smaller the pepper, the hotter it is.
5. Can I save seeds from my chili peppers?
Yes, you can save seeds from ripe peppers. Make sure to dry the seeds thoroughly before storing them in a cool, dark place.
6. Should I remove the flowers from my chili pepper plant?
It’s best not to remove flowers unless the plant is overcrowded. Flowers are essential for fruit production.
7. How do I store fresh chili peppers?
Store fresh chili peppers in the refrigerator for about 1-2 weeks. For longer storage, consider freezing or drying them.
8. What diseases should I look out for when growing chili peppers?
Common diseases include powdery mildew, blight, and root rot. Monitor your plants regularly for signs of these issues.
By following this comprehensive guide, you’ll be well on your way to cultivating your very own batch of spicy chili peppers right from your balcony. Enjoy the process, experiment with different varieties, and relish the flavorful rewards that come from your efforts! Happy gardening!