Growing snack peppers, also known as mini peppers, in containers is an excellent option for urban gardeners and those with limited space. These vibrant, flavorful vegetables not only add color and crunch to your meals but are also relatively easy to cultivate. Whether you’re working with a balcony, patio, or even a sunny windowsill, this guide will equip you with the knowledge to grow snack peppers successfully.
Understanding Snack Peppers
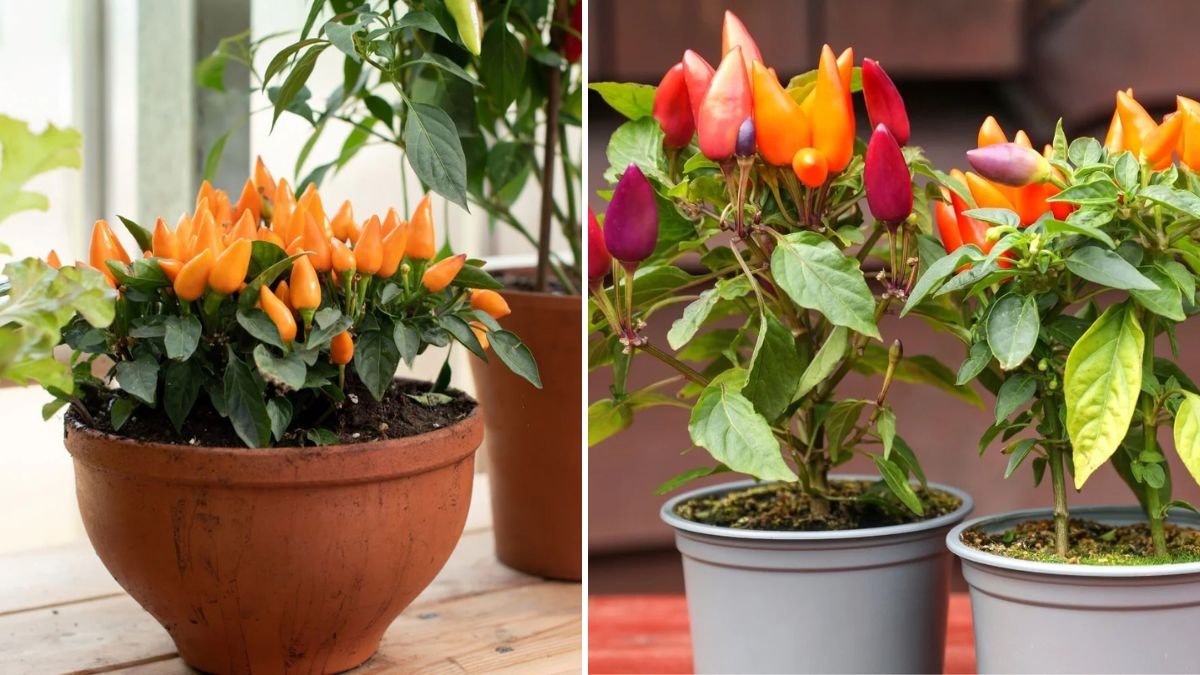
Snack peppers are typically smaller, sweet varieties of bell peppers, and they come in a range of colors, including red, yellow, orange, and even purple. Their small size makes them perfect for a quick snack or incorporation into salads, stir-fries, and other dishes. More importantly, they are generally quick to grow and produce a generous harvest, making them ideal for container gardening.
Latest Posts
- OnePlus 15T Smartphone Unveiled – Featuring 200MP Camera, Snapdragon 8 Elite Gen 5 and Massive Battery
- Lava Yuva 5G Unveiled – 120Hz Display and Strong Performance for Everyday Use
- Nokia 1100 Launched – Premium Keypad Phone Returns at Budget Price ₹2,500
- Motorola G96 5G Unveiled – Featuring Stylish Design, Strong Performance and Advanced Camera Tech
- Vivo Y21d Unveiled – Massive 6000mAh Battery for All-Day Everyday Use
- Nothing Phone 4 Ultra 5G Launched – 16GB RAM, AI-Powered 50MP Camera and Flagship Performance
- OnePlus 5G Smartphone Launched – 300MP AI Camera, 7000mAh Battery & 100W Fast Charging
- Nothing Phone 3a Pro – High processor smartphone for gaming lovers – battery is 5000mAH
- Realme 15 Pro – 3 days battery backup smartphone with 50MP front camera under ₹28,000
- Vivo X200 FE – 12GB RAM + 256GB Storage smartphone with HD quality camera
Choosing the Right Container
1. Container Size
Select a container that is at least 5 gallons in size. This allows enough room for the roots to spread comfortably. Larger containers tend to retain moisture better and provide a more stable environment for your plants.
2. Drainage
Ensure your container has drainage holes to prevent waterlogging. Good drainage is crucial since pepper plants dislike having “wet feet.” If using a decorative pot without drainage holes, consider placing your plant in a smaller inner pot that has holes, allowing excess water to escape.
3. Material Selection
Consider containers made of materials that offer good insulation. Terracotta, ceramic, and plastic are popular choices. Each material has its pros and cons: terracotta is breathable but may dry out faster, while plastic retains moisture better but can overheat in direct sunlight.
Selecting Snack Pepper Varieties
Different pepper varieties exhibit different growth habits and flavors. For container gardening, consider the following popular types:
- Mini Bell Peppers: These are a classic choice for small gardens. They come in various colors and are sweet, making them great for snacking or salads.
- Sweet Snack Peppers: Varieties like ‘Snackabelle’ are bred specifically for containers and produce abundant fruits.
- Cubanelle Peppers: Known for their slightly fruity flavor, they grow well compactly and are versatile for various dishes.
Soil Requirements
1. Type of Soil
Use a high-quality potting soil that is lightweight and well-draining. Avoid garden soil, which can become compacted in pots, restricting root growth and preventing drainage.
2. pH Level
The ideal soil pH for snack peppers is between 6.0 and 6.8. You can test your soil’s pH using a home testing kit. If the soil is too acidic, you can amend it by adding lime; if too alkaline, add sulfur or organic matter.
3. Nutrient-Rich Additives
To ensure your plants thrive, incorporate organic matter like compost or well-rotted manure into your potting mix. This provides essential nutrients while enhancing soil structure.
Planting Snack Peppers
1. Timing
Snack peppers love warmth. Start your seeds indoors 8 to 10 weeks before the last expected frost date. Alternatively, you can buy young plants from a nursery.
2. Seed Germination
If you’re starting from seeds, sow them about ¼ inch deep in seed trays filled with potting mix. Keep the soil moist but not soggy, and place the trays in a warm spot or use a heat mat to maintain a warm temperature (70-80°F) for optimal germination.
3. Transplanting
Once seedlings have at least two sets of true leaves and it’s warm outside (typically after the last frost), transplant them into larger containers. Space the plants about 12-16 inches apart to ensure good air circulation.
Care and Maintenance
1. Watering
Consistent moisture is key. Water your snack pepper plants regularly, ensuring the top inch of soil remains moist. However, avoid overwatering; the soil should not be soggy. A general rule of thumb is to water deeply when the top inch feels dry.
2. Fertilizing
Fertilize every four to six weeks with a balanced fertilizer. Look for a fertilizer with equal parts nitrogen, phosphorus, and potassium (e.g., 10-10-10). As peppers begin to flower and set fruit, switch to a fertilizer higher in phosphorus to encourage blooming and fruiting.
3. Sunlight Requirements
Snack peppers thrive in full sun, requiring at least 6-8 hours of sunlight daily. If you’re in a particularly hot climate, consider providing some afternoon shade to prevent sunscald.
4. Pruning and Support
While snack peppers generally don’t require extensive pruning, removing any dead or yellowing leaves can help maintain plant health. For taller plants, consider using small stakes or cages for support, especially during fruiting when they may become heavy.
5. Pest and Disease Management
Common pests that affect pepper plants include aphids, spider mites, and whiteflies. Use organic insecticidal soap or neem oil to manage these pests. Watch for signs of diseases, such as wilting or yellowing leaves. Ensure good air circulation and avoid overhead watering to reduce fungal diseases.
Harvesting Snack Peppers
1. Timing
Snack peppers are usually ready to harvest about 70-90 days after planting, depending on the variety. They can be harvested when they are green, which is earlier, or left to ripen fully to their mature color for a sweeter flavor.
2. How to Harvest
To harvest, use a pair of sharp scissors or garden shears to cut the stem just above the pepper. Avoid twisting or pulling, as this can damage the plant.
3. Storage
Store harvested snack peppers in the refrigerator for up to one week. They are best enjoyed fresh but can also be roasted, frozen, or pickled for longer storage.
FAQs about Growing Snack Peppers in Containers
1. Can I grow snack peppers indoors?
Yes, snack peppers can be successfully grown indoors if they have access to sufficient sunlight (at least 6-8 hours a day) or grow lights.
2. How often should I water my snack peppers?
Water your snack peppers whenever the top inch of soil feels dry, typically every 2-3 days, depending on weather conditions.
3. Do snack peppers need to be pollinated?
Snack peppers are self-pollinating but will benefit from gentle shaking or tapping to help distribute pollen, especially if grown indoors.
4. What size container works best for growing snack peppers?
Containers should be at least 5 gallons for optimal growth and moisture retention.
5. How can I tell if my snack peppers are ready to harvest?
Snack peppers can be harvested when they are firm and shiny. For maximum sweetness, allow them to ripen fully to their mature color.
6. What pests should I watch for?
Common pests include aphids, spider mites, and whiteflies. Regularly inspect your plants and use organic pest control methods if needed.
7. Can I reuse potting soil for my peppers?
While you can reuse potting soil, it’s best to refresh it with new soil or compost to replenish nutrients and reduce the risk of disease.
Conclusion
Growing snack peppers in containers is a rewarding endeavor, ideal for those with limited space. With a little care and attention, you can enjoy a bountiful harvest of these sweet, crunchy peppers. Follow the tips shared in this guide, and soon you’ll be snacking on your homegrown produce, adding a burst of flavor to your meals. Happy gardening!