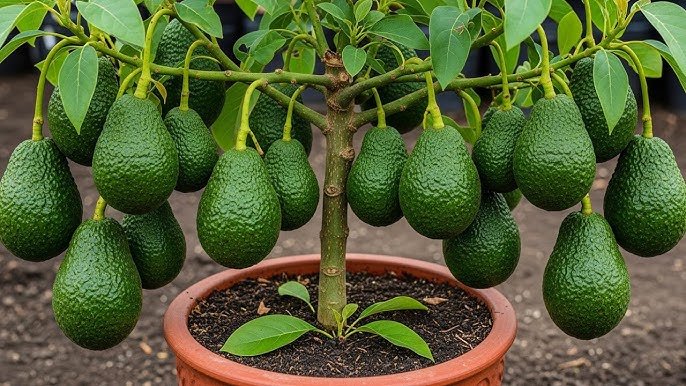
Growing avocado trees at home is a dream for many gardeners. Avocados are tasty, nutritious, and extremely rewarding to grow—especially when you raise the tree yourself from a small cutting. While most people grow avocados from seeds, cuttings offer a huge advantage: you get a true clone of the parent tree, meaning your new plant has the same fruit quality, growth habit, and productivity as the original.
If you’ve ever wanted to grow avocados at home without waiting years for seed-grown plants to mature, this detailed, step-by-step guide will show you how to grow healthy avocado trees from cuttings easily and successfully.
Why Propagate Avocado from Cuttings?
Many gardeners wonder whether avocado cuttings actually work. The answer is yes—with the right method.
Here’s why using cuttings is a great option:
- Faster maturity than seed-grown plants
- Guaranteed fruit type (seed-grown avocados vary)
- Less waiting time
- Cheaper than grafting
- Perfect for home growers
While avocado cuttings can be slightly more challenging than other fruit trees, the right rooting conditions make the process much easier and highly successful.
Latest Posts
- OnePlus 15T Smartphone Unveiled – Featuring 200MP Camera, Snapdragon 8 Elite Gen 5 and Massive Battery
- Lava Yuva 5G Unveiled – 120Hz Display and Strong Performance for Everyday Use
- Nokia 1100 Launched – Premium Keypad Phone Returns at Budget Price ₹2,500
- Motorola G96 5G Unveiled – Featuring Stylish Design, Strong Performance and Advanced Camera Tech
- Vivo Y21d Unveiled – Massive 6000mAh Battery for All-Day Everyday Use
- Nothing Phone 4 Ultra 5G Launched – 16GB RAM, AI-Powered 50MP Camera and Flagship Performance
- OnePlus 5G Smartphone Launched – 300MP AI Camera, 7000mAh Battery & 100W Fast Charging
- Nothing Phone 3a Pro – High processor smartphone for gaming lovers – battery is 5000mAH
- Realme 15 Pro – 3 days battery backup smartphone with 50MP front camera under ₹28,000
- Vivo X200 FE – 12GB RAM + 256GB Storage smartphone with HD quality camera
What You Need to Get Started
Before beginning, gather the following simple materials:
- Healthy avocado branch (semi-hardwood)
- Sharp, sterilized pruning scissors
- Rooting hormone or honey/aloe gel
- A small container or pot
- Cocopeat, perlite, or sand-based mix
- Clear plastic bag or bottle
- Spray bottle for watering
- Optional: cinnamon powder (natural antifungal)
These items help create the perfect moist and high-humidity environment needed for root formation.
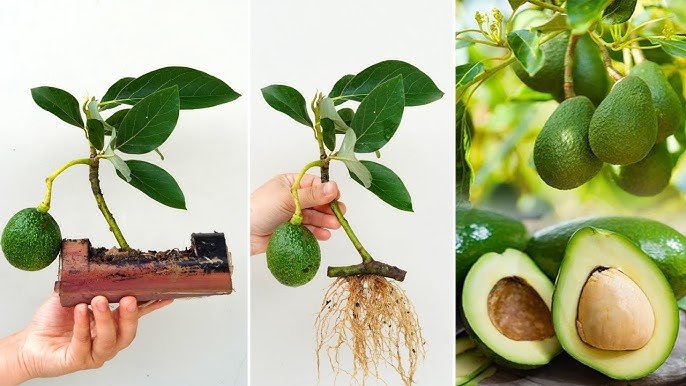
Step 1: Selecting the Perfect Avocado Cutting
Your success begins with choosing the right branch.
✔ Best Cutting Type:
- Semi-hardwood (not too soft, not too old)
- 6–8 inches long
- Has 3–4 leaf nodes
- Healthy with no pests or diseases
- Branch from a productive, fruiting tree
Make a clean 45-degree cut below a node. This exposes more surface area and encourages faster root development.
Avoid flowering or fruiting branches—they expend energy on fruits, not root formation.
Step 2: Prepare the Cutting Properly
Once you have the avocado branch, prepare it like this:
- Remove all leaves except two small ones at the top.
- If leaves are large, cut them in half to reduce water evaporation.
- Gently scrape off the green outer layer near the base (1 inch).
- Dip the scraped base into:
- Rooting hormone (best result)
- Aloe vera gel
- Honey
- Or dust with cinnamon
Scraping exposes cambium tissue, helping the cutting form callus faster.
Step 3: Choose the Best Rooting Medium
Avocado cuttings need extremely airy, well-draining material.
Best rooting medium options:
- Cocopeat + perlite (1:1)
- Pure perlite
- Cocopeat + sand
- Seed-starting mix + perlite
Avoid heavy soil—avocado stems rot easily.
Step 4: Plant the Cutting
Make a small hole in the rooting mix and insert the cutting 2–3 inches deep. Press the medium lightly around the base so the cutting stands securely.
Water just enough to moisten the medium—do not drench it.
🌡 Step 5: Create a High-Humidity Chamber (Mini Greenhouse)
This is the secret to rooting avocado cuttings successfully.
Cover the pot with:
- A transparent plastic bag
- A clear jar
- A cut plastic bottle
- A humidity dome
This traps moisture and creates a warm, humid micro-environment—critical for avocado root formation.
Tips for perfect humidity:
- Keep the setup in bright, indirect sunlight
- Maintain 70–80% humidity
- Ensure slight airflow by making a few holes
- Mist only when medium begins to dry
Your cutting will soon begin forming callus tissue at the base.
Week-by-Week Rooting Timeline
Avocado cuttings root slower than lemon or guava but with proper humidity, they root well. Here is what to expect:
Week 1: Callus Formation Begins
The base begins healing and the scraped area swells slightly.
The cutting might look unchanged above the soil—normal.
Week 2: Early Root Development
Internal root cells begin forming.
New leaf buds may appear at the top.
Week 3: Root Tips Form
Tiny white root tips start growing.
The cutting becomes stronger and greener.
Week 4–5: Visible New Leaves
New shoots mean the cutting has established roots.
Keep humidity but slowly reduce it.
Week 6: Root System Ready
By this time, the cutting should have enough roots to survive on its own.
Step 6: Hardening and Transplanting
Once the cutting has new growth, begin gradually removing the plastic dome:
- Day 1–2: Open slightly
- Day 3–5: Half open
- Day 6–7: Remove fully
This prevents shock and helps your young avocado adapt to normal air.
After 6–8 weeks, transplant the cutting into a bigger pot.
🪴 Best Soil Mix for Avocado Plants
Avocados love well-draining soil. Use:
- 40% garden soil
- 30% compost
- 20% sand/perlite
- 10% cocopeat
This keeps the soil aerated and nutrient-rich.
Use a 10–12 inch pot first, then upgrade every year as the plant grows.
How to Care for Your New Avocado Tree
Once your cutting becomes a plant, follow these care tips:
Sunlight
6–7 hours of bright light daily.
Watering
Water only when the top inch feels dry.
Avocados hate soggy roots.
Fertilize
After 2 months, feed with:
- Compost tea
- Cow dung compost
- Seaweed extract
- Banana peel fertilizer
Feed monthly during the growing season.
✂ Pruning
Prune the top to encourage branching.
More branches = more potential fruiting.
Common Mistakes to Avoid
Many people fail with avocado cuttings because of a few simple mistakes:
- Overwatering
- Heavy soil
- Lack of humidity
- Direct sunlight exposure
- Using soft, immature stems
- Not scraping the stem end
Avoid these, and your success rate will increase dramatically.
When Will Your Avocado Tree Fruit?
Cutting-grown avocado trees mature earlier than seed-grown ones.
★ Possible fruiting time: 2–4 years
★ Seed-grown trees: 5–10 years
With good sunlight, proper pruning, and yearly fertilization, your tree can produce beautiful avocados right at home.
Final Thoughts
Growing avocado trees from cuttings is an incredibly rewarding experience. While it takes patience and care, the method ensures you grow a high-quality, true-to-type avocado tree without the long waiting period of seed-grown plants.
By selecting the right cutting, using an airy rooting medium, maintaining humidity, and following proper care routines, you can successfully grow your own avocado tree—even in a small balcony or backyard.
Start today, and in a few weeks you’ll see roots