Bamboo is a versatile and fast-growing plant, prized for its strength, beauty, and ecological benefits. Whether you’re a gardening enthusiast or a landscape professional, propagating bamboo can be a rewarding endeavor. One of the most effective and reliable propagation methods is through culm cuttings. This guide will walk you through the process in detail, ensuring your bamboo propagation project is successful.
Understanding Bamboo Propagation
Bamboo belongs to the grass family and propagates primarily through rhizomes underground. However, propagating from rhizomes can be challenging and labor-intensive. Culm cutting—the process of using sections of the bamboo stem or culm—is a simpler and often more accessible method for gardeners.
Latest Posts
- OnePlus 15T Smartphone Unveiled – Featuring 200MP Camera, Snapdragon 8 Elite Gen 5 and Massive Battery
- Lava Yuva 5G Unveiled – 120Hz Display and Strong Performance for Everyday Use
- Nokia 1100 Launched – Premium Keypad Phone Returns at Budget Price ₹2,500
- Motorola G96 5G Unveiled – Featuring Stylish Design, Strong Performance and Advanced Camera Tech
- Vivo Y21d Unveiled – Massive 6000mAh Battery for All-Day Everyday Use
- Nothing Phone 4 Ultra 5G Launched – 16GB RAM, AI-Powered 50MP Camera and Flagship Performance
- OnePlus 5G Smartphone Launched – 300MP AI Camera, 7000mAh Battery & 100W Fast Charging
- Nothing Phone 3a Pro – High processor smartphone for gaming lovers – battery is 5000mAH
- Realme 15 Pro – 3 days battery backup smartphone with 50MP front camera under ₹28,000
- Vivo X200 FE – 12GB RAM + 256GB Storage smartphone with HD quality camera
What Are Culm Cuttings?
Culms are the woody, biomass-producing stalks of bamboo that grow above ground. Propagating bamboo from culm cuttings involves taking healthy, mature sections of the bamboo stem and encouraging them to develop roots and shoots to become new plants.
Materials Needed
Before starting, gather the necessary materials:
- Healthy bamboo culm (mature but not too old)
- Sharp pruning shears or a saw
- Rooting hormone (optional but recommended)
- Potting mix or planting medium (well-draining and rich in organic matter)
- Pots or planting containers
- Plastic bags or a propagator to maintain humidity
- Watering can or spray bottle
- Garden gloves
Step-by-Step Guide to Propagating Bamboo from Culm Cuttings
Step 1: Selecting the Culm
Choose a healthy bamboo culm that is mature (typically 1-2 years old). Avoid very old culms as they might be less vigorous, and young culms may not root well. Look for culms that have visible nodes, as these nodes are crucial for root development.
Step 2: Preparing the Culm Sections
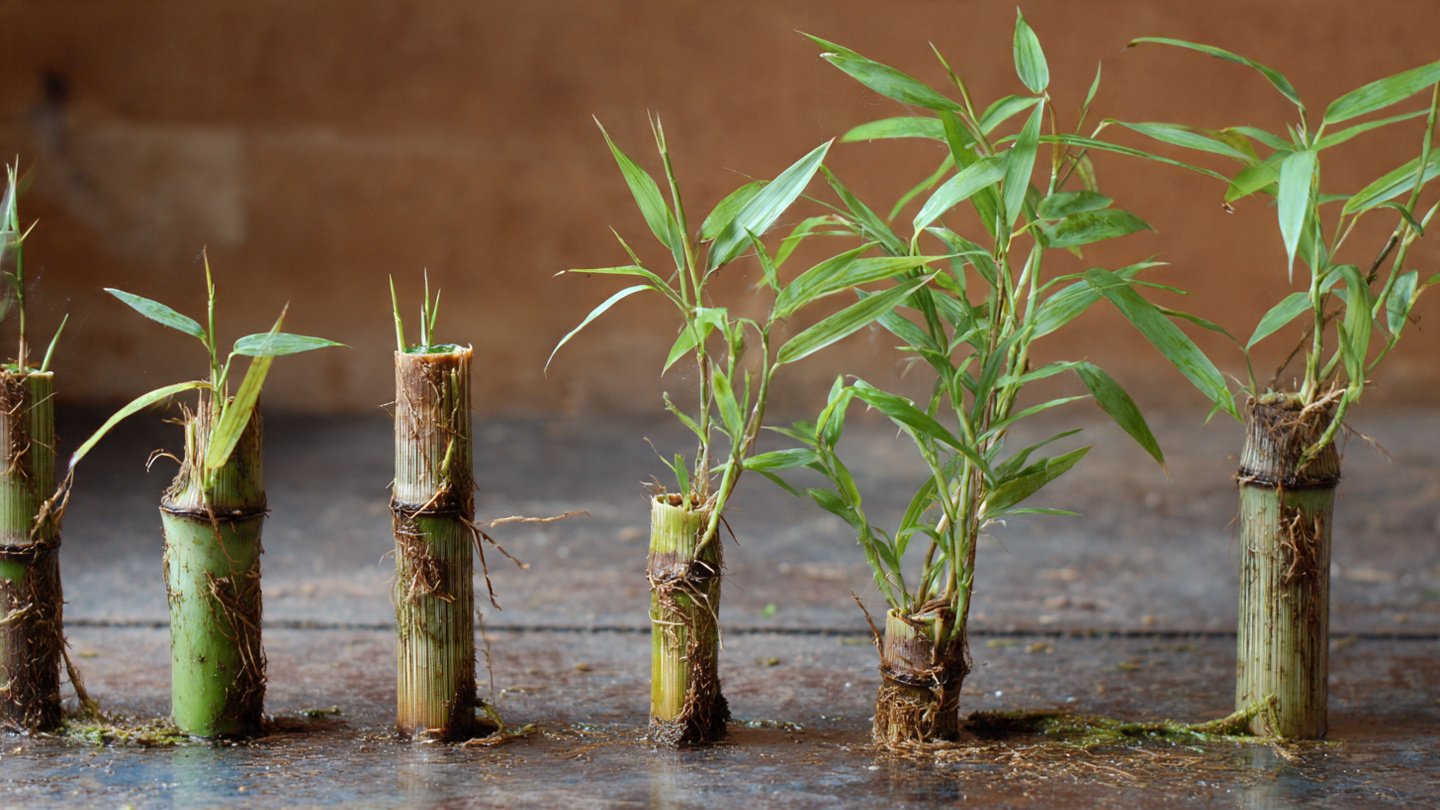
Cut the bamboo culm into sections 12 to 18 inches long, making sure each section has at least two to three nodes. Nodes are the joints on the culm where roots and shoots can emerge.
Make the cuts with a clean, sharp saw or pruning shears to avoid damaging the plant tissue.
Step 3: Treating the Cuttings (Optional)
Dip the ends of the cut bamboo sections in rooting hormone powder or gel. Rooting hormone promotes faster root development and can improve your chances of success, although healthy bamboo can root without it.
Step 4: Preparing the Planting Medium
Use a well-draining, fertile potting mix. A mix of garden soil, sand, and organic compost works well. Ensure the soil is moist but not waterlogged.
Fill your pots or planting containers with this mixture.
Step 5: Planting the Culm Cuttings
Lay the bamboo culm cuttings horizontally on the soil or plant them vertically with at least one node buried underground. If planting horizontally, ensure that at least one node is in contact with the soil, as roots will primarily emerge from these nodes.
If planting vertically, bury a node 3-4 inches below the soil surface, and leave at least one node above ground.
Step 6: Watering and Humidity
Water the cuttings thoroughly after planting to settle the soil around the nodes. Maintain consistent moisture but avoid overwatering to prevent rot.
Cover the pots with plastic bags or use a propagator to maintain humidity, which is essential for root development.
Step 7: Providing Ideal Growing Conditions
Place the plant pots in a warm, shaded area with indirect sunlight. Bamboo prefers temperatures between 65-85°F (18-29°C) and high humidity. Avoid direct sunlight during the initial rooting phase, as it can dry out the cuttings.
Step 8: Monitoring Growth
Rooting can take anywhere from 4 to 8 weeks depending on the species and environmental conditions. During this time, keep the soil moist and check regularly for any signs of mold or rot.
You can gently tug on the cuttings after a few weeks to feel for resistance, indicating root growth.
Step 9: Transplanting
Once the culm cuttings have developed a healthy root system and new shoots are visible, they can be transplanted into larger pots or directly into the ground. Gradually acclimate the new plants to outdoor conditions if they have been propagated indoors.
Tips for Successful Bamboo Propagation
- Select the right bamboo species: Some species root more easily from culm cuttings than others. Clumping bamboo varieties generally root better than running types.
- Time it right: The best time to take culm cuttings is during the active growing season, typically spring or early summer.
- Sterilize tools: To prevent the spread of disease, always sterilize your cutting tools before making cuts.
- Use fresh cuttings: Bamboo culm cuttings should be planted as soon as possible after cutting; delays decrease their viability.
- Patience matters: Rooting bamboo takes time; rushing the process or overwatering can harm the cuttings.
Common Challenges and Solutions
- Rotting cuttings: Overwatering or poor drainage can cause rot. Ensure your potting mix is well-draining and avoid waterlogging.
- Slow root development: Rooting hormone usage and maintaining optimal humidity and temperature can speed up the process.
- Pests and diseases: Bamboo is relatively pest-resistant, but watch out for fungal infections in humid conditions. Use fungicides if necessary.
Benefits of Propagating Bamboo from Culm Cuttings
- Cost-effective method to multiply plants without buying new ones.
- Ensures genetic consistency with the parent plant.
- Fosters a deeper understanding and connection to your plants.
- Ideal for creating new bamboo groves or filling landscape spaces quickly.
Conclusion
Propagating bamboo from culm cuttings is an accessible and rewarding way to grow new bamboo plants, whether you want to expand your garden or contribute to sustainable landscaping. By following this step-by-step guide and maintaining the right conditions, you’ll increase your chances of growing healthy, vigorous bamboo plants. Remember that patience and care are key — soon, your cuttings will sprout resilient bamboo shoots, adding beauty and green benefits to your environment. Happy gardening!