Date palms (Phoenix dactylifera) are prized for their delicious fruit, ornamental beauty, and ability to thrive in warm climates. Growing date palms from seeds at home can be a rewarding experience, allowing you to cultivate your own mini oasis and eventually enjoy fresh dates. While growing date palms from seeds requires patience and attention, it is entirely feasible with the right steps. This article provides a comprehensive guide on how to start date palm seeds at home, from seed selection to germination to early care and planting.
1. Selecting Quality Date Palm Seeds
The first step in growing date palms from seeds is selecting good quality seeds. Here’s what to look for:
Latest Posts
- OnePlus 15T Smartphone Unveiled – Featuring 200MP Camera, Snapdragon 8 Elite Gen 5 and Massive Battery
- Lava Yuva 5G Unveiled – 120Hz Display and Strong Performance for Everyday Use
- Nokia 1100 Launched – Premium Keypad Phone Returns at Budget Price ₹2,500
- Motorola G96 5G Unveiled – Featuring Stylish Design, Strong Performance and Advanced Camera Tech
- Vivo Y21d Unveiled – Massive 6000mAh Battery for All-Day Everyday Use
- Nothing Phone 4 Ultra 5G Launched – 16GB RAM, AI-Powered 50MP Camera and Flagship Performance
- OnePlus 5G Smartphone Launched – 300MP AI Camera, 7000mAh Battery & 100W Fast Charging
- Nothing Phone 3a Pro – High processor smartphone for gaming lovers – battery is 5000mAH
- Realme 15 Pro – 3 days battery backup smartphone with 50MP front camera under ₹28,000
- Vivo X200 FE – 12GB RAM + 256GB Storage smartphone with HD quality camera
- Source: Obtain seeds from fresh, ripe dates. You can buy fresh dates from grocery stores or date farms. Avoid dried or processed dates as their seeds may be less viable.
- Freshness: The fresher the date, the higher the chances of germination. If possible, extract seeds from fresh, moist dates.
- Seed Condition: Use intact seeds that are not cracked, moldy, or damaged. Healthy seeds have a hard, smooth outer shell.
2. Cleaning and Preparing Seeds
Once you have fresh date seeds, the next step is to clean and prepare them for germination:
- Remove the Pulp: Carefully remove all flesh residues from the seeds by washing them under running water. You can use a soft brush to scrub gently.
- Soaking: Soak the cleaned seeds in warm water for 24 to 48 hours. This softens the seed coat and helps improve germination rates.
- Changing Water: Change the soaking water every 12 hours to prevent fermentation or mold growth.
3. Scarification (Optional)
Date palm seeds have a hard outer coat which can slow germination. Scarification helps by lightly damaging the seed coat to facilitate water absorption.
- Mechanical Scarification: Use sandpaper or a nail file to gently scratch the surface of the seed coat without damaging the inner part.
- Soak Again: After scarification, soak the seeds again in warm water overnight.
Scarification is optional but can speed up the germination process.
4. Choosing a Germination Method
There are several methods to germinate date palm seeds. Two popular methods are the paper towel method and direct sowing in soil.
Paper Towel Method
- Moisten a paper towel but avoid making it soaking wet.
- Place the seeds on the paper towel, leaving space between them.
- Fold the towel to cover the seeds.
- Place the towel inside a plastic bag or an airtight container to retain humidity.
- Keep the setup in a warm, dark place with temperatures between 75°F and 85°F (24°C to 29°C).
- Check the towel every few days to ensure it stays moist. Mist with water if it begins to dry out.
- Germination can take from 4 to 8 weeks, sometimes longer.
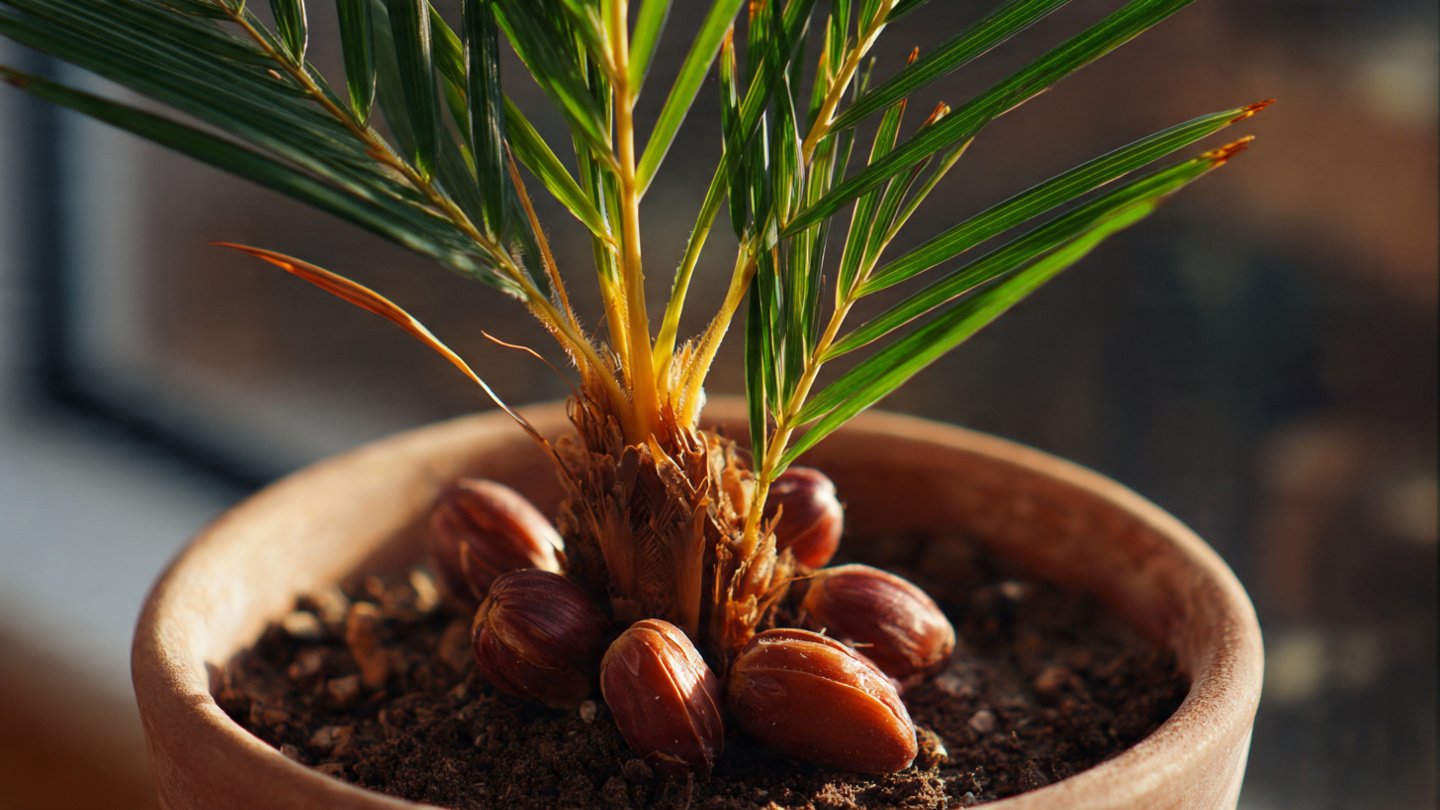
Direct Sowing in Soil
- Use a well-draining seed-starting mix or sandy soil.
- Fill seed trays or pots with the soil, leaving about 1 inch (2.5 cm) from the top.
- Plant seeds about 1 to 2 inches (2.5 to 5 cm) deep, with the pointed end facing down.
- Water the soil lightly but thoroughly.
- Cover the pots with a plastic dome or plastic wrap to maintain humidity.
- Place the pots in a warm location with indirect sunlight.
- Keep the soil moist but not soggy.
5. Caring for Germinating Seeds
- Temperature: Date palm seeds require warmth for successful germination. Keep the environment at consistent temperatures between 75°F and 85°F.
- Humidity: High humidity is essential to prevent the seeds from drying out.
- Light: Seeds do not need light to germinate; indirect light or darkness is best initially.
- Patience: Germination may take several weeks to months. Be patient and avoid disturbing the seeds too much.
6. Transplanting Seedlings
Once the seeds germinate and seedlings develop their first set of true leaves, they can be transplanted for further growth.
- Container Size: Choose pots that are at least 6 inches (15 cm) in diameter to give roots ample space.
- Soil Type: Use well-draining soil mix with sand or perlite to promote drainage.
- Planting Depth: Plant seedlings at the same depth they were growing in the seed trays.
- Watering: Water the seedlings well after transplanting but avoid waterlogging.
- Light: Provide bright, indirect sunlight to encourage healthy growth.
7. Ongoing Care for Young Date Palm Seedlings
- Watering: Water when the top inch of soil feels dry. Date palms prefer moist but not soggy soil.
- Fertilizing: Start feeding with a balanced, diluted fertilizer every 4 to 6 weeks during the growing season.
- Temperature: Keep young palms in temperatures above 60°F (15°C). Protect them from cold drafts.
- Pest Control: Monitor for pests like spider mites or scale insects and treat appropriately.
8. Transplanting Outdoors (if applicable)
If you live in a suitable climate (typically USDA zones 9-11), you can transplant your date palm outdoors once seedlings are sturdy and several months old.
- Location: Choose a sunny, well-draining location.
- Soil: Amend soil if necessary to improve drainage.
- Spacing: Date palms need space to grow tall, so plant seedlings at least 15 to 20 feet apart.
- Watering: Water regularly during establishment.
9. Additional Tips for Success
- Use fresh seeds for higher germination rates.
- Keep detailed notes on dates and results to improve future attempts.
- Avoid overwatering as date palms are susceptible to root rot.
- Be patient; date palms grow slowly from seeds and may take several years to bear fruit.
- Consider grafting if faster fruit production is desired.
Conclusion
Starting date palm seeds at home requires patience, care, and the right environment. By selecting quality seeds, properly preparing and germinating them, and providing attentive care during the early stages, you can successfully grow your own date palms. Whether for ornamental purposes or for the eventual harvest of fresh dates, growing date palms from seeds offers a rewarding gardening challenge. Follow these step-by-step instructions and cultivate your own little slice of desert paradise right at home!