
Guava is one of the most rewarding fruit trees to grow—fast-growing, hardy, drought-tolerant, and capable of producing delicious fruit even in small spaces. Yet many gardeners struggle with traditional propagation methods like seeds, cuttings, or simple air-layering, which often produce slow-growing or weak plants.
But now, growers have discovered a new and highly effective technique known as the Multi-Layer Root-Boost Method—a modern approach that combines the strengths of air-layering, root stimulation, and moisture control to produce guava plants that root faster, grow stronger, and start fruiting earlier.
In this detailed 1200-word guide, you’ll learn exactly how to use this innovative method at home with simple materials.
Why This New Method Is Different
Traditional guava propagation methods each have limitations:
Seeds
- Slow growth
- Genetic variation
- Late fruiting
Cuttings
- Low success rate during hot seasons
- Root rot issues
Simple air-layering (marcottage)
- Takes long
- Layers may dry out
- Weak roots if not managed properly
The Multi-Layer Root-Boost Method solves all these problems by creating a supercharged rooting environment directly on the parent branch.
Latest Posts
- OnePlus 15T Smartphone Unveiled – Featuring 200MP Camera, Snapdragon 8 Elite Gen 5 and Massive Battery
- Lava Yuva 5G Unveiled – 120Hz Display and Strong Performance for Everyday Use
- Nokia 1100 Launched – Premium Keypad Phone Returns at Budget Price ₹2,500
- Motorola G96 5G Unveiled – Featuring Stylish Design, Strong Performance and Advanced Camera Tech
- Vivo Y21d Unveiled – Massive 6000mAh Battery for All-Day Everyday Use
- Nothing Phone 4 Ultra 5G Launched – 16GB RAM, AI-Powered 50MP Camera and Flagship Performance
- OnePlus 5G Smartphone Launched – 300MP AI Camera, 7000mAh Battery & 100W Fast Charging
- Nothing Phone 3a Pro – High processor smartphone for gaming lovers – battery is 5000mAH
- Realme 15 Pro – 3 days battery backup smartphone with 50MP front camera under ₹28,000
- Vivo X200 FE – 12GB RAM + 256GB Storage smartphone with HD quality camera
It uses three layers of moisture, nutrients, and rooting stimulants to:
✔️ Speed up root formation
✔️ Improve root density
✔️ Make young plants far more vigorous
✔️ Prevent drying out
✔️ Boost early fruiting potential
What You Need for the Root-Boost Method
You only need simple items available at home:
Core Materials
- A healthy guava branch (thickness of a finger)
- Sharp knife or blade
- Cocopeat (moist)
- Sphagnum moss OR rice husk
- Compost or vermicompost
- A handful of garden soil
- Natural root stimulants (choose any):
- Aloe vera gel
- Willow water
- Honey + cinnamon
- Plastic wrap or cling film
- Aluminum foil
- String, thread, or cable ties
Optional Boosters
- Neem powder (prevents fungal issues)
- Crushed eggshell (for calcium)
- Banana peel pieces (for potassium)
The Multi-Layer Structure (3 Layers Explained)
The success of this new method comes from using three strategic layers around the branch:
Layer 1: Root-Stimulant Gel
This instantly activates rooting hormones and prevents infection.
Layer 2: Moisture Retention Layer
Made with cocopeat + moss/rice husk to keep the area consistently moist.
Layer 3: Nutrient Starter Layer
A thin mixture of soil + compost helps roots grow vigorously once they emerge.
This 3-layer design mimics natural soil—but right on the branch!
Step-by-Step Guide: How to Use This New Propagation Method
Follow these steps carefully to achieve a near-100% success rate.
Step 1: Select the Perfect Branch
Choose:
- A healthy, disease-free branch
- 1–2 years old
- Pencil-thick or slightly thicker
- Not too hard, not too soft
Branches that bend slightly without snapping are ideal.
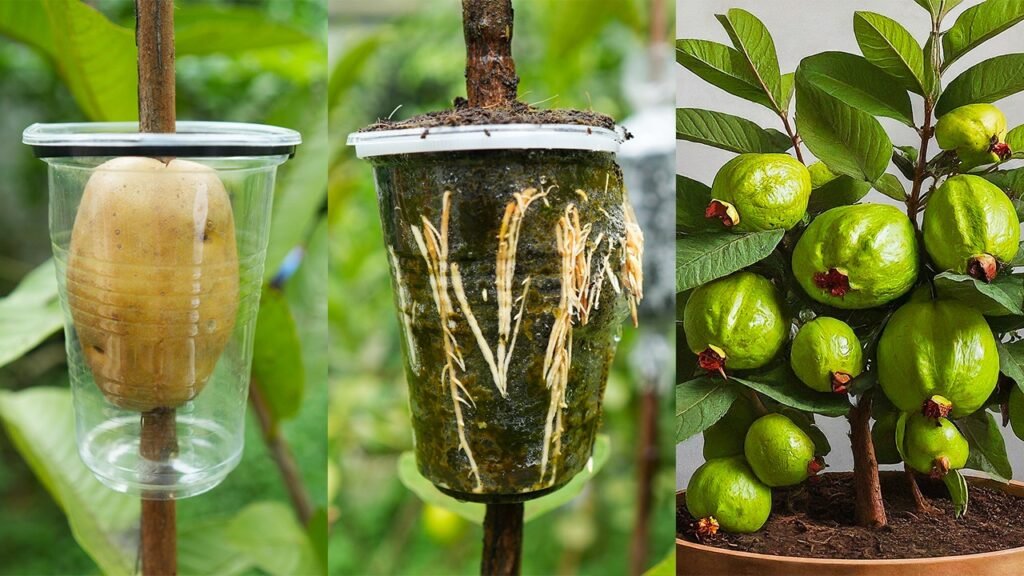
🔪 Step 2: Make the Rooting Ring Cut
Using a clean knife:
- Make a circular cut around the branch.
- Make another circular cut 1–1.5 cm below the first.
- Connect the two cuts with a vertical slit.
- Remove the bark strip completely.
You should now see the greenish-white wood inside.
👍 Tip:
Scrape the exposed wood very lightly to remove any remaining cambium layer.
This prevents bark from regrowing and forces root formation.
✨ Step 3: Apply the Root-Stimulant Gel (Layer 1)
Use any of these natural rooting stimulants:
- Fresh aloe vera gel
- Honey + cinnamon paste
- DIY willow water
Coat the exposed area gently.
This helps:
✔️ Trigger fast root development
✔️ Prevent bacteria and fungi
✔️ Keep the area moist temporarily
Step 4: Add the Moisture Retention Layer (Layer 2)
Now prepare a moist mixture:
- 50% cocopeat
- 50% moss or rice husk
Squeeze it gently—it should be soft, moist, but not dripping.
Wrap this around the exposed area until you get a ball-like shape.
This layer ensures:
✔️ Continuous moisture
✔️ High oxygen levels
✔️ Low risk of root rot
Step 5: Add the Nutrient Starter Layer (Layer 3)
Prepare a small handful of:
- 1 part garden soil
- 1 part vermicompost
- Optional: pinch of neem powder
Cover the outside of the moisture layer with this nutrient soil.
This outer layer gives newly formed roots the nutrition they need.
Step 6: Wrap, Seal, and Protect
Now wrap the entire multi-layer ball with:
1️⃣ Plastic wrap or cling film
2️⃣ Aluminum foil on top to block sunlight
3️⃣ Tie both ends with thread or cable ties
Why foil?
Roots grow best in darkness.
Foil also reduces heat in summer.
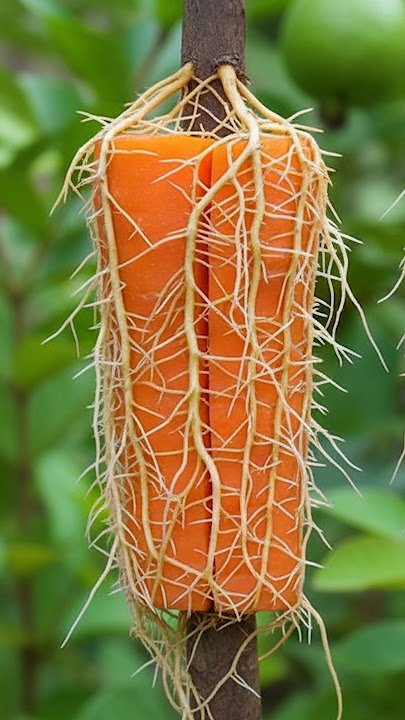
Step 7: Wait & Monitor (20–35 Days)
Within two to five weeks (depending on climate):
- Roots begin forming
- The ball becomes firm
- You may see roots pressing against the cling film
Do not open the wrap too early.
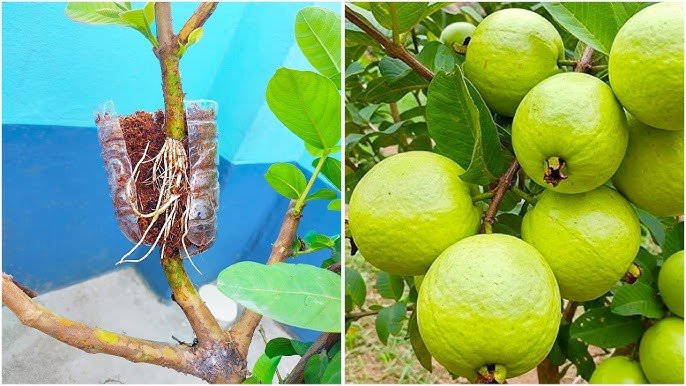
Step 8: Separate and Plant Your New Guava Tree
Once you see white or cream roots:
- Cut the branch just below the root ball.
- Remove the foil & outer layer carefully.
- Do NOT remove the root-holding soil—keep it intact.
- Plant the new guava plant in a pot or directly in the ground.
First Week Care:
- Keep in partial shade
- Water lightly every 2–3 days
- Avoid fertilizers for 20 days
The plant will start producing new leaves very quickly.
Advantages of This New Propagation Method
The Multi-Layer Root-Boost Method offers superior benefits:
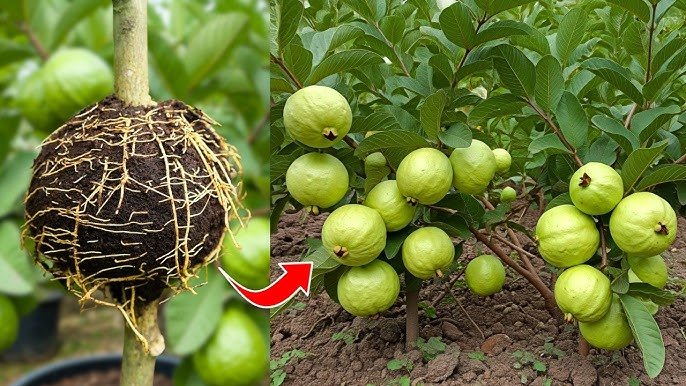
1. Extremely High Success Rate (90–100%)
Because the branch already has roots before cutting, the risk of transplant shock is very low.
2. Fastest Root Formation
Traditional air-layering takes 45–60 days.
This method often produces roots in 20–30 days.
3. Early Fruiting Potential
Plants propagate through this method:
- Hold the genetic quality of the parent tree
- Grow faster
- Can fruit within 1–2 years, not 3–4
🌧 4. Works in All Seasons
Unlike cuttings, this method works during:
- Summer
- Monsoon
- Late winter
(Just avoid extremely cold weather.)
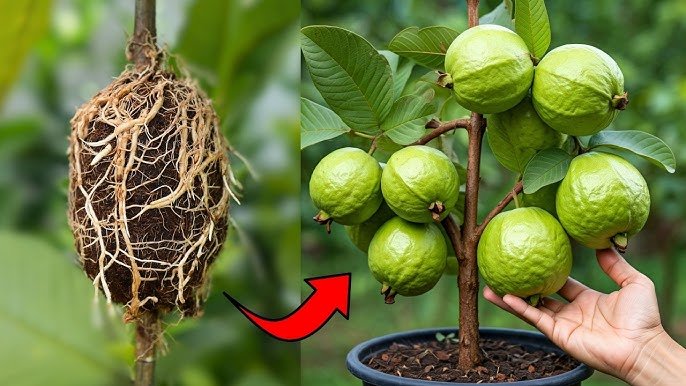
5. Stronger Root Mass
The 3-layer system produces:
✔️ Thick roots
✔️ Dense root network
✔️ Longer root hairs
This helps the plant adapt quicker after transplanting.
6. No Special Equipment Needed
Everything can be done using simple garden or household materials.
Best Time to Use This Method for Maximum Results
To get the strongest roots:
✔️ Best: February–April
✔️ Excellent: July–September
✔️ Good: October–November
Avoid very cold months (Dec–Jan).
Caring for Your New Guava Plant
After planting, follow these tips:
Sunlight
4–6 hours of sunlight during early growth.
Watering
Keep soil slightly moist.
Avoid waterlogging.
Feeding
After 20–25 days, feed with:
- Compost tea
- Mustard cake water
- Seaweed extract
Once a month is enough.
Pruning
Pinch the growing tips to encourage branching.
More branches = more fruits.
Conclusion: A Simple Yet Revolutionary Way to Propagate Guava
The Multi-Layer Root-Boost Method is one of the most effective and beginner-friendly propagation techniques ever discovered for guava.